When you are first starting out with editor scripting in Unity, the best thing to starting playing with is the inspector. Being one of the things we interact with the most as Unity developers, it is quite beneficial to be able to change it and generally control it. Lucky for us it is the simplest part of the editor to extend and edit, so even if you are not keen about going very far with coding the editor in Unity, you should at least acquaint yourself with the inspector part of it.
But before we get into full-blown inspector scripting, we will use a couple of posts to take a brief look at some of the simpler aspects of editor scripting that don’t need their own custom classes. Today we will examine some of the most useful Unity Attributes made available to us by the nice people over at Unity.
Unity attributes are the simplest and yet one of the most useful things about editor scripting in Unity as they allow you to very quickly adjust the look and functionality of the inspector without having to write tons of code or even create new scripts, so lets look at an example.
Say you are making an RPG game, and you have an Item class that looks like this:
|
|
Your inspector will look something like this:
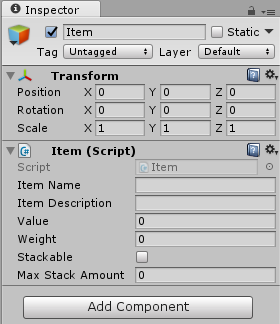
Standard inspector view
Which is not too bad, until you consider the fact that there is absolutely no error handling or checks to make sure that the values are valid.
There is no guide for designers to know for example what the range of weights should be or how value work.
In addition, everything is lumped together in a way that can become very messy once more variables are added, and even at the current stage
it is not very nice to look at.
For such modifications which fall on the simpler side of things, attributes can be very handy. The first thing one might do is to group the different variables, so we can have “Mandatory” properties and “Optional” ones.
In this case, the “Stackable” and “Max Stack Amount”
properties can be considered to be optional. The Header attribute is perfect for grouping and can be used like so:
 1class Item : MonoBehaviour
 2{
 3    string ID;
 4    [Header("Mandatory")]
 5    public string itemName;
 6    public string itemDescription;
 7    [Space(10)]
 8    public int value;
 9    public float weight;
10
11    [Header("Optional")]
12    public bool stackable;
13    public int maxStackAmount;
14}
Now the inspector is easier to read:
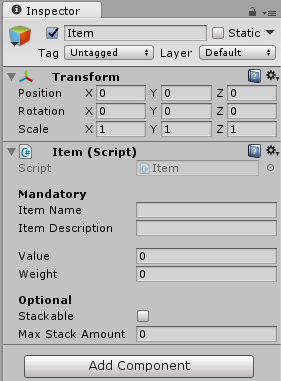
Improved inspector with Header and Space
Simply put the attribute name between square brackets above the variable or beside it, pass it any parameters it might need and you are done.
You will also note the Space attribute I added, which creates a space of ‘x’ pixels before the variable its on.
With only three lines of code, we already have a nicer inspector!
Now while these two attributes are useful for adjusting looks, the real power of attributes comes from ones that actually affect how you interact with variables and ensure we enter proper values.
One very useful attribute to guide users is the Tooltip attribute, and it does just what it says on the tin, it shows a tooltip
for a variable when the user hovers the mouse over it.
For strings, we have two similar attributes with slightly different functionality, which are the Multiline and TextArea attributes.
They both provide the ability to have multiple lines for string fields in the inspector, the difference is that the TextArea attribute gives a scrollbar, while Multiline does not.
Both can also be passed a default number of starting lines.
For numeric variables, like int and float, we have the Range attribute. It creates a slider in the inspector with minimum and maximum values,
which is extremely useful to ensure that your values are always valid.
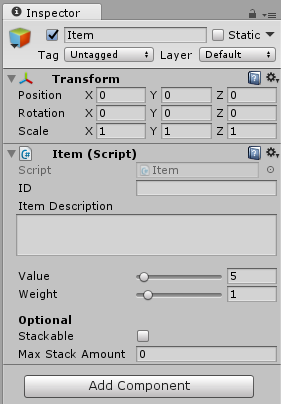
Putting these three new attributes into use gives us:
 1class Item : Monobehaviour
 2{
 3    string ID;
 4    [Header("Mandatory")]
 5    public string itemName;
 6    [TextArea] public string itemDescription;
 7
 8    [Space(10), Range(0, 100)]
 9    public int value = 5;
10    [Range(0, 10)]
11    public float weight = 1;
12
13    [Header("Optional")]
14    public bool stackable;
15    [Tooltip("This is ignored if 'stackable' is false")]
16    public int maxStackAmount;
17}
Text areas, sliders, and tooltips
As you can see, multiple attributes can be put together in one line or on the side of a variable. Also, some attributes like TextArea don’t have mandatory parameters.
The last four attributes I would like to look at are under what I consider “Special” attributes, since they don’t directly deal with the layout or functionality of variables, however they are still very useful to know about.
The first two are the HideInInspector and SerializeField attributes. Those are opposites of each other, where the former prevents a public variable from being shown in the inspector,
and the latter shows a private variable in the inspector.
1[SerializeField] string ID;
2[Header("Mandatory"), HideInInspector]
3public string itemName;
Using serialize field and Hide in inspector attributes
Previously, the ID field was hidden in the inspector while the itemName field was shown, which was due to their private and public modifiers respectively.
However, by adding these attributes we can override the default inspector behavior to show/hide variables regardless of their access modifiers.
It should also be noted that the “Mandatory” header text has disappeared along with the itemName field,
which is due to the fact that attributes are attached to their variables, therefore if a variable is hidden then any attributes that belong to it are disabled.
Last but not least, there exists two immensely useful attributes that affect not individual fields, but the component as a whole, and those are the DisallowMultipleComponent
and RequireComponent attributes, which are placed on the class instead of a variable.
DisallowMultipleComponent prevents you from placing the script more than once on a game object, for example to prevent you from having two PlayerMovement scripts on one object.
RequireComponent allows you to specify other components that must exist for this component to work. For example, if the PlayerController script needs
PlayerMovement and PlayerLook scripts for it to work, this attribute will automatically add them when the controller script is attached to a game object.
Additionally, this attribute will prevent you from removing these required components until the controller itself is removed first. I highly recommend getting in the habit of using these two attributes.
1[DisallowMultipleComponent, RequireComponent(typeof(PlayerMovement), typeof(PlayerLook))]
2public class PlayerController : MonoBehaviour
3{
4
5}

Require component doing its magic
After specifying the required scripts as shown in the code above, simply dragging the script into the inspector will automatically place all the requirements as well. Also, if you try to place the script again an error message will popup because of our DisallowMultipleComponent attribute.
I hope this has been a useful introduction to the world of editor scripting, and while this is basic and generally well known, it still is good to mention as attributes are really quick to use while simultaneously having the potential to greatly aid the process of making a game.
Keep in mind this doesn’t cover all the available attributes, a comprehensive list can be found here in the sidebar to the left, but we did cover the most commonly applicable attributes and how to use them.
In Part 3 we will look at Gizmos and how you can create your own.